
Work Records are the work activities or tasks that live within Tree Details or Work Orders and store the work task for a tree. You can add Work Records (WR), archive work that has been done by your Organization, be notified when work is due, and analyze the work at your Organization using charts, graphs and tables. In TreePlotter™, you can add Work Records for a single tree or a group of trees.
Topics covered in this tutorial:
- Adding Work Records for a Single Asset
- Adding Work Records for a Single or Multiple Asset(s)
- Updating Work Record Details
- Work History and Archiving Work Records
- Work Records in the Data Table
- Work Record Reports
- Work Record Notifications
- Work Record Photos
Adding Work Records for One Asset:
Add within the Asset/Tree Details form
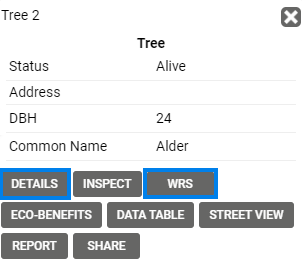
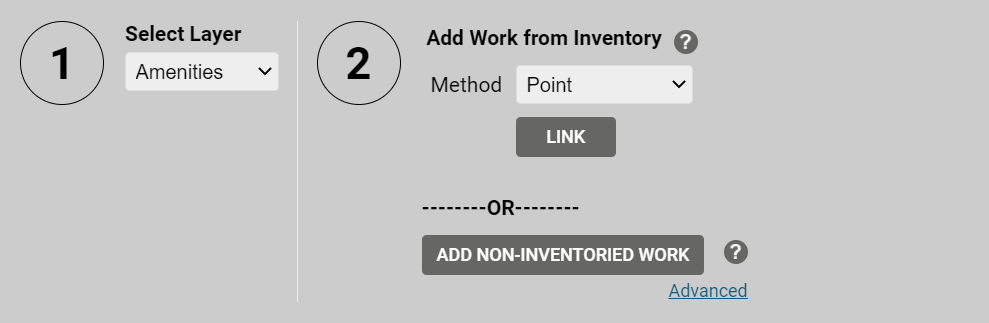
You can add a Work Record in the Details form of a specific asset for any of the layers in your application. First, select the layer in the Interactive Legend that you would like to add work records to. You can access the Work Records by either opening the Details Form and navigating to the Work Records tab, or directly open the Work Records tab by clicking on the ‘WRS’ button in the asset’s popup.
In the Work Records tab, you might see two sub tabs: Inventory Mode and WR (Work Record) table. You can add a Work Record in either location.
To Add, click the ‘Add’ button and a new, blank record will appear in the table.
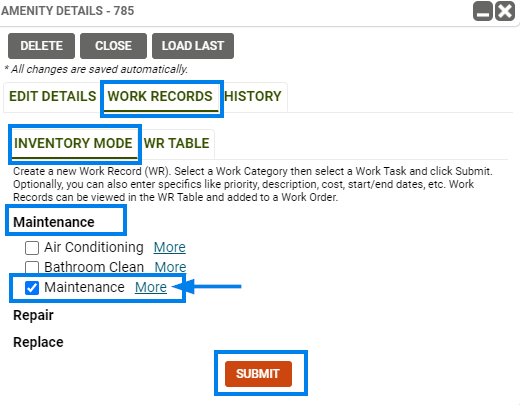
Using Inventory Mode
Inventory mode is a way to add the Work Record in a form-like format. Not all TreePlotter INVENTORY™ applications will have Inventory Mode, but this is something that our Professional Services team can turn on for you. Reach out to support@planitgeo.com if you need assistance turning the tool on.
In Inventory Mode in the Work Records tab, you can add a Work Record by clicking on a Work Category (ie. Maintenance), checking a Work Task, and then clicking ‘More’. When clicking ‘More’, all of the fields will appear and can be filled in. When you are finished entering information on the Work Record, click the ‘Submit’ button. The Work Record will then be added to the WR table.
From Asset/Tree Inspections
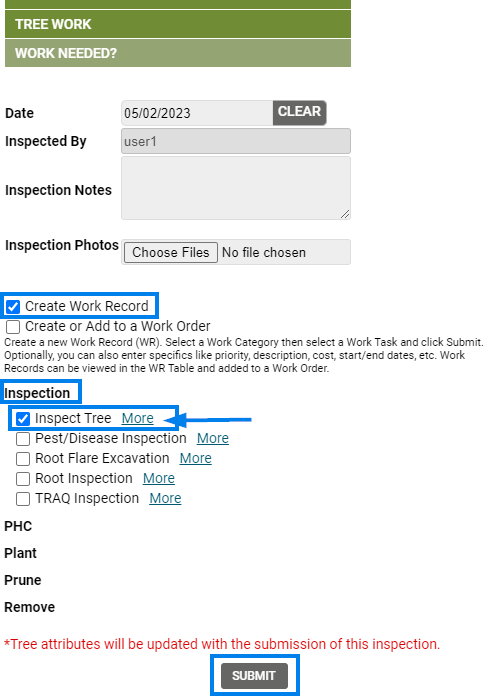
You can simultaneously add a Work Record while doing an inspection. This will allow the user to enter the Work Record(s) in a form-like format, similar to the above Inventory Mode.
Select the layer from the Interactive Legend, then click on the asset you are going to inspect and click the ‘Inspect’ button.
After filling out the Inspection details, scroll to the bottom of the form and check the Add Work Record box.
This expands the options to add a Work Record. Select a Work Category and fill in the Work Record details. You can enter as many work records as needed for this asset. When finished, click the ‘Submit’ button at the bottom of the form.
It is important to note that if your Asset layer uses Advanced Inspection Forms, you will not have the ability to create a Work Record this way using that layer.
Adding Work Records for one Asset or Multiple Assets:
Work Records/Work History Data Table
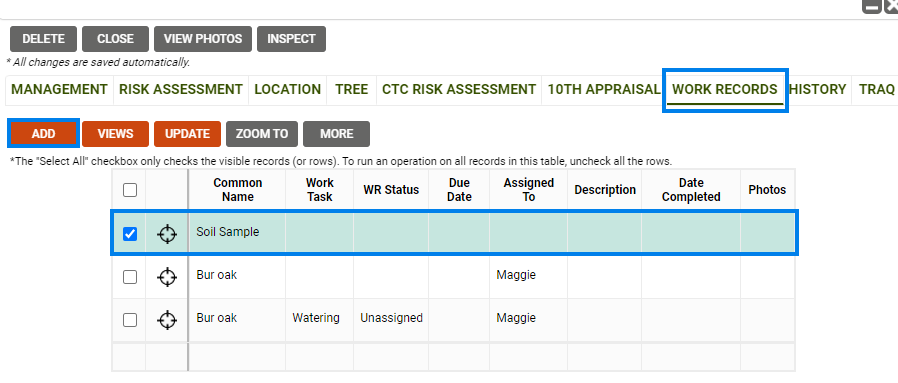
To find the Data Table for Work Records/Work History, visit the ‘Data’ button in the top left corner of your TreePlotter screen.
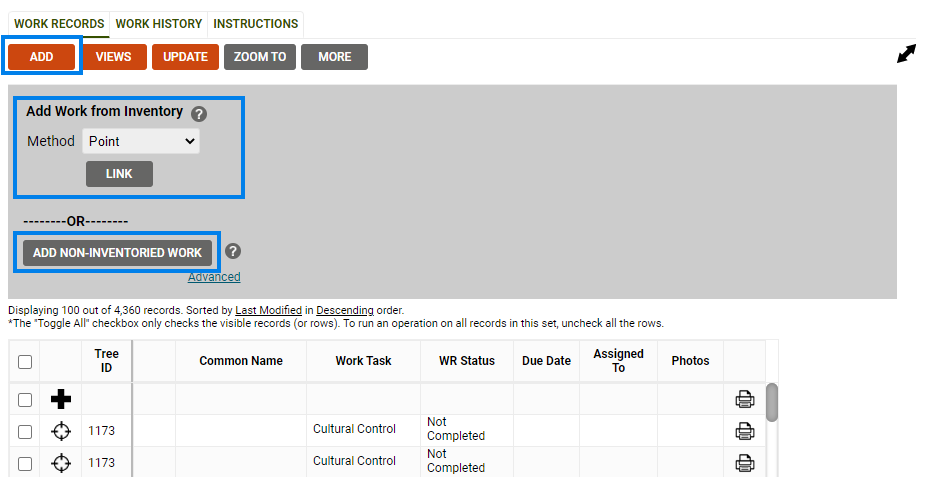
In the Work Records/Work History Table, you can add a Work Record for one or multiple trees by clicking the ‘Add’ button. After clicking ‘Add’, you will see a Method dropdown field where you can choose to Add a Work Record for one point, multiple points, drawing a polygon around a group of assets, using the Advanced Filter, or by an asset’s Primary ID.
By selecting Point or ID, you can create a Work Record for a single asset.
By selecting Multiple Points, Polygon, or Advanced Filter, you can create new Work Records for multiple assets.
Select the proper method, then click the ‘Link’ button. You will then be directed to the layer where you can choose the single point, multiple points, draw the polygon, or directly create Work Records using the Advanced Filter.
Once finished, multiple records or a single record will appear highlighted in the Work Records Data table.
From a Work Order
To add a Work Record from the Work Orders layer, select the Work Orders layer in the Interactive Legend. Select the Work Order on the map that you would like to add a Work Record to. Navigate to the Work Records tab of the Work Order Details form. Click the ‘Add’ button. First select a layer that you would like to add your Work Record to, then select a method to link the existing Work Records or new Work Records to.
Click the ‘Link’ button after you select the layer and the Method. The Work Order window will minimize and you will be able to link Work Records to your assets. The Asset layer will automatically be selected in the Interactive Legend and be viewable on your map. Select the asset on your screen that you would like to Link. When you are finished making your selections, click the ‘Done Linking’ button at the bottom left corner of the screen .
If you want to add a Work Record to an Asset that is not yet on the map, click the ‘Add Non Inventoried Work’ button. This feature will allow you to create a Work Record and add the Asset to your map later on.
Updating Work Record Details:
After adding Work Records, you can update the Task, Assigned To, and other details within the Work Record.
To update Work Record Details for one Work Record, click on the cell you are wanting to update in the table and enter or select a value.
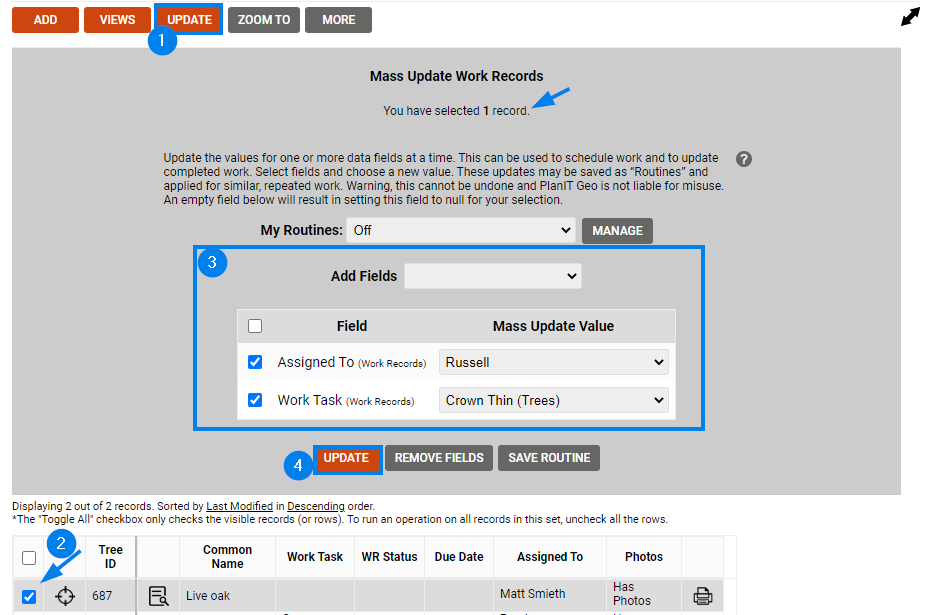
To update multiple records and fields simultaneously, you can use the Update tool. This tool is available to some roles within the Work Records Data table or the Work Record table in the Details form for an Asset or Work Orders.
Simply click on the records you are wanting to update by selecting the toggle boxes, then click the ‘Update’ button. Those records will be selected at the top of the tool. Using the Add Field drop down you can select the field(s) you are want to update, enter values for each, and then click the ‘Update’ button.
Understanding Work History and Completing Work:
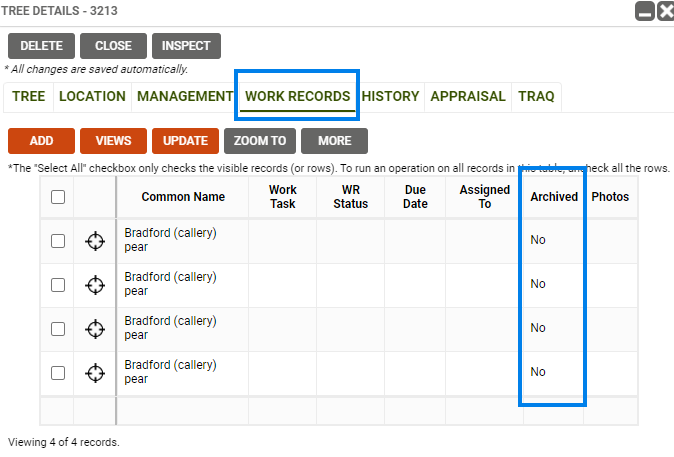
Work History refers to completed Work Records that have been Archived. After adding a Work Record and changing the WR Status of the Work Record to complete, most Work Records will automatically Archive. The Completed Date will also populate automatically when the Work Record is completed. To find the Completed Work Records, click on the History tab > Work History tab.
To do this manually, check the Archived box in the Work Record table. The Archived Record will move the Work Record from the Work Record table in the Work Records tab into the Work History tab under the History tab.
If your Work Records are not automatically archiving (visible in Work History) and you would like them to, please contact support@planitgeo.com so we can make the appropriate changes. If you would not like the Work Record to automatically Archive, let us know, and we can also make that change for you.
Before Archiving:
After Archiving:
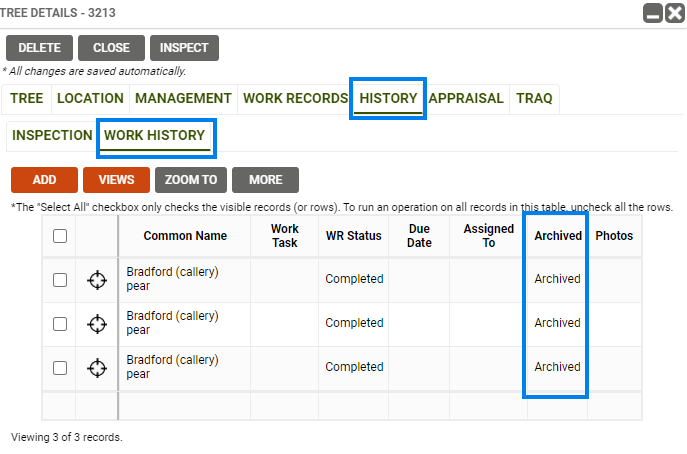
Once a Work Record is Archived and moved into Work History, its details cannot be edited. It can be deleted, duplicated, zoomed to and managed using the ‘More’ button in the Work History table.
Work Records and Work History in the Data Table:
To manage Work Records and Work History, you can update Work Records, zoom to, sync, duplicate, delete, or export your Work Records in the Data Table. Open the Data Table, and Click on the Work Record/Work History data table. Work Records and Work History are kept in separate tables. The Work History is not able to be updated once the Work Record is completed and archived (turned into Work History). To learn more about managing your data in the Data Table, click here.
Work Records and Work History Reports:
You can print out detailed reports on the current and previous work at your Organization. Navigate over to the Hub, click on the Reports section and then expand Work Record/ Work History Reports. There are many report templates to choose from. You can run fully detailed reports or just summaries of the work that has taken place. You can organize those reports by Species, Genus, or Work Orders.
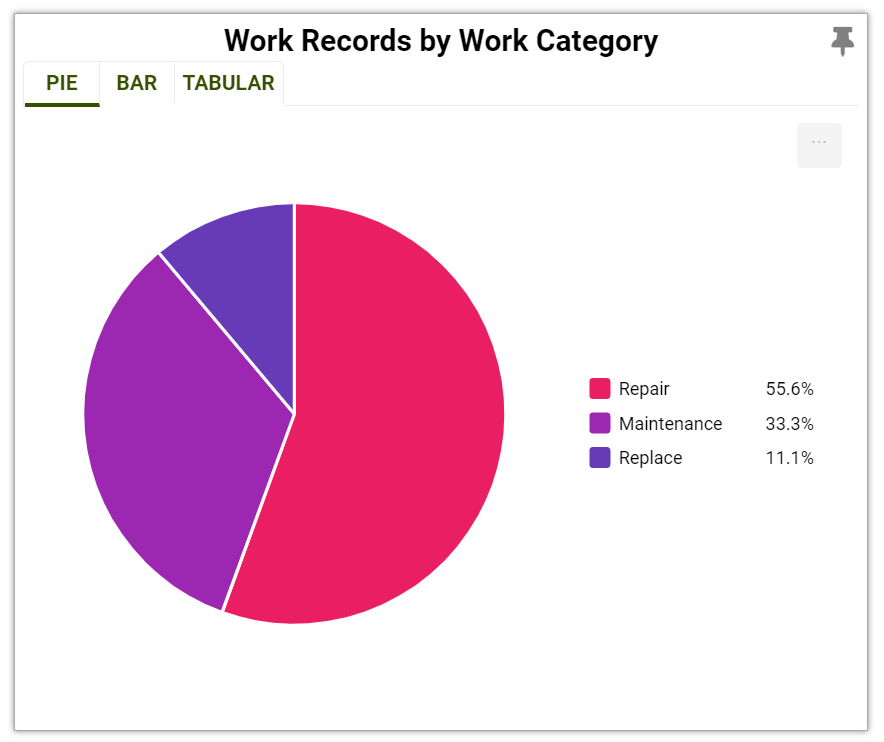
Work Records and Work History Analysis:
In the Stats section of the Hub, you can analyze the type of work being done at your Organization in chart, bar graph, or tabular format. You can analyze the Work Records by Status or by the Work Category.
Notifications and Work Records:
When work is approaching its Due Dates or is overdue at your Organization, you will receive Notifications in the Hub. Open the Hub, select Notifications, and select the layer you are wanting to view the Work Records for. Then, click on the Work Records link. TreePlotter will then automatically apply a filter to your map, for you to be able to view the Work Orders or Assets with those due Work Records. Select either of those layers in the interactive legend and you will be redirected to those Work Records that need to be handled. To learn more about Notifications, click here.
Attaching Photos to Work Records:
You can attach photos to Work Records in the Data Table, Tree Details form, or from a Work Order.
Navigation:
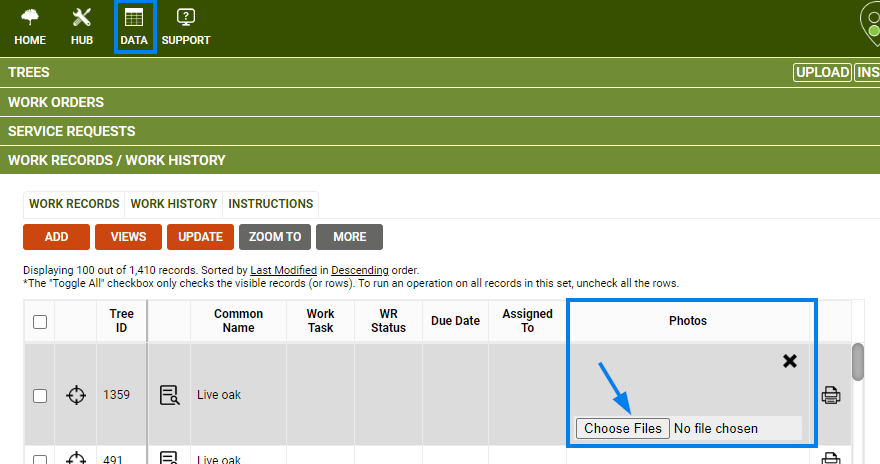
Data Table:
Select the group of trees you wish to view with the Advanced Filter tool, then navigate to the Data Table found next to the Hub. Once in the Data Table, select Work Records / Work History.
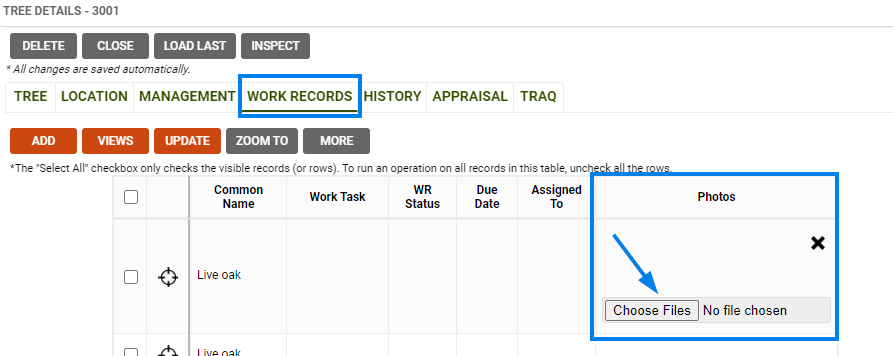
Tree Details Form:
Select the Trees layer, then select the tree you would like to attach a photo to. Select the Work Records tab.
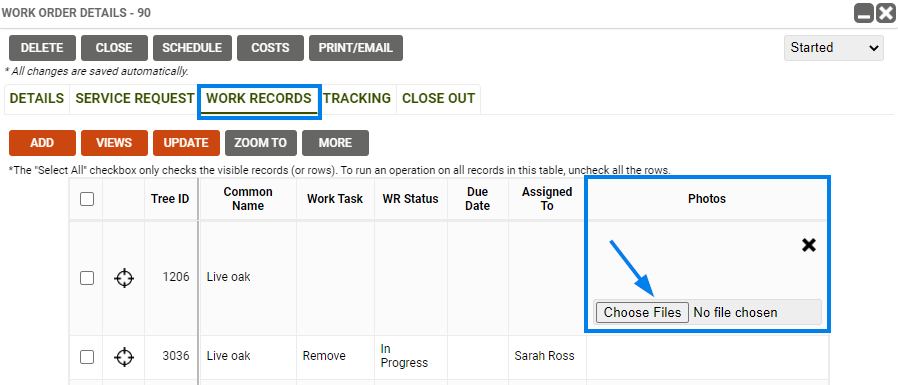
Work Order:
Select the Work Orders layer, then select the work order you would like to attach a photo to. Select the Work Records tab.
Uploading the photo:
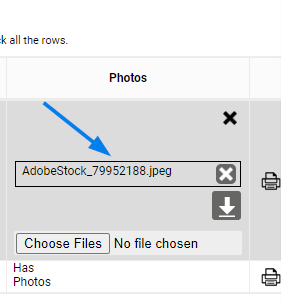
Once you are in the display, you will find a column titled ‘Photos’. Double click on the cell with the corresponding ‘Photos’ column and tree ID. In the open cell select the ‘Choose File’ button which will allow you to take one photo directly with the camera on the device, or to navigate to the image(s) you wish to select from the device. Up to 5 images can be added from browsing your device.
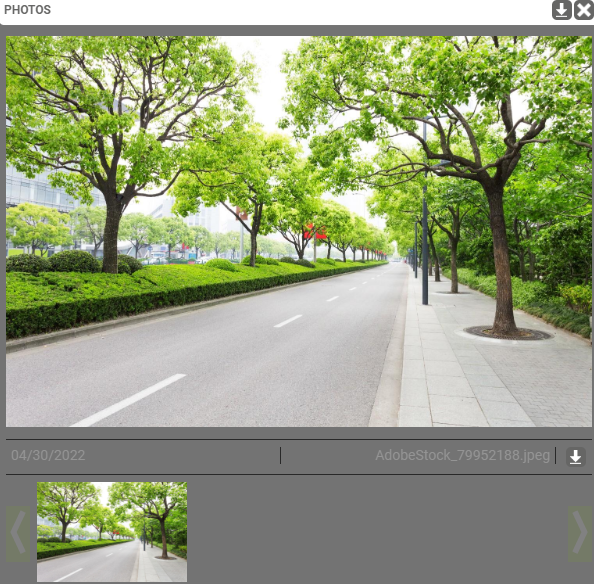
Viewing the Photo:
Now you have added a photo to the tree’s Work Records which can be viewed in the Tree Details form under the Work Record tab and in the Tree Reports found in the WRS tab within the initial tree popup window.
Known limitations:
- Once a Work Record is Archived and moved into Work History, it’s details cannot be edited.
- Editing Work Records can be difficult when out in the field. We recommend using the ‘Update’ button when updating Work Records out in the field to update more than one record.
- Work Records can be edited in TreePlotte Offline.