
Learn how to create a Photo Report within TreePlotter™ that includes all of the selected Tree asset’s photos. The Report includes separate sections for each photo type.
Prerequisites:
- Tutorial: Adding Trees
- Tutorial: Tree Reports
- Tutorial: Inspections
- Tutorial: Work Records
- Tutorial: Advanced Filter
Details:
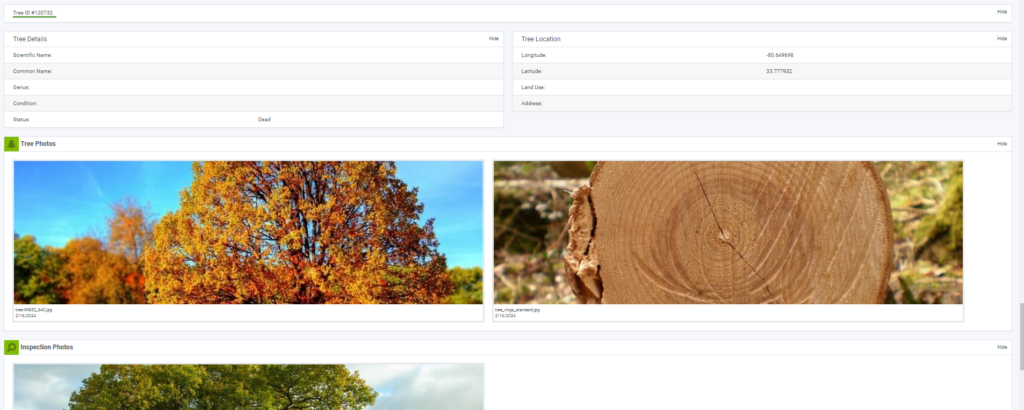
- The first section of the Photo Report contains Tree Detail information, such as Species and Location.
- Below the Tree Details are separate sections for each Photo type: Tree Photos, Inspection Photos, and Work Record Photos. Each individual photo will also include metadata like Photo Name and the Date the photo was attached.
Accessing the Tree Photo Report:
Before running a Tree Photo Report, first make sure to set a filter for only Trees with Photos. If you are mainly interested in Trees with Photos in the Details Form, set a filter on the Trees layer. If you are interested in Inspection or Work Records Photos, set a filter on either of those layers. The example below shows how to set a Filter on the Trees layer. Reference the ‘Filtering Multiple Layers‘ section of the Advanced Filter article to learn how to set a filter on another layer.
Setting a Filter:
- Open the Advanced Filter
- Using the Add Field dropdown, add the Photos field to the Filter.
- Select the Photos field from the filter and check the ‘With Photos’ checkbox.
- Click the ‘Apply’ button to filter your Trees to display only those with Photos attached.
Running Tree Photo Report
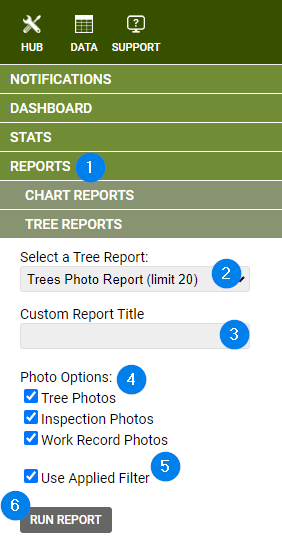
- Go to Hub > Reports > Tree Reports
- In the Select a Tree Report dropdown, select the ‘Trees Photo Report (limit 20)’ option
- Optional: provide the report a Custom Report Title
- In the Photo Options list, select all Photo types that you wish to include by clicking the checkboxes. You can chose any combination of type.
- Tree Photos
- Work Record Photos
- Inspection Photos
- Ensure Use Applied Filter is checked*
- Click the ‘Run Report’ button to generate the report.
*Since the report is currently limited to 20 Trees, it is best to set and use a filter that isolates Trees with Photos. If running the report for a specific set of trees, see the Advanced Filter article for how to apply a tree map filter, or for a range of Tree ID’s.
Navigating the Report:
- After running the report, you will see several sections per Tree, beginning with the header and Tree Details.
- Below the Details are the Photo Sections, labeled by type.
- Each individual Photo has a caption containing the Photo Name and Date it was uploaded.
- Optionally, you can hide any section you prefer to exclude in this dynamic report.
Printing Reports:
- Once you have generated your report and hidden any required sections, click on the ‘Print’ button in the top right
- You can print to a physical printer or to PDF
- You can control whether the automatically generated headers and footers (that contain the name of the report, page numbering, etc.) are included using the checkbox on the Print dialogue box.

Known Limitations:
- All Photos in each section are ordered chronologically from newest to oldest
- File Type restrictions: .JPG, .PNG, .GIF
- There is a file size limit of 65MB, but any photos larger in size will automatically be sized down if too large
- The report is currently limited to the Trees layer with associated Inspections and Work Records
- The current limit of the report is at 20 Trees.