
The Inspections tool allows users to update and track changes to an asset’s attributes over time. Inspections can either be viewed for the total inventory in the Inspections data table, or on a per tree basis from the Inspections tab within the History tab in the Details form.
Topics covered in this tutorial:
- Navigating to the Inspection Tool
- Inspection Tool Properties
- Adding and Removing Fields
- Viewing Past Inspections
Navigating to the Inspection Tool:
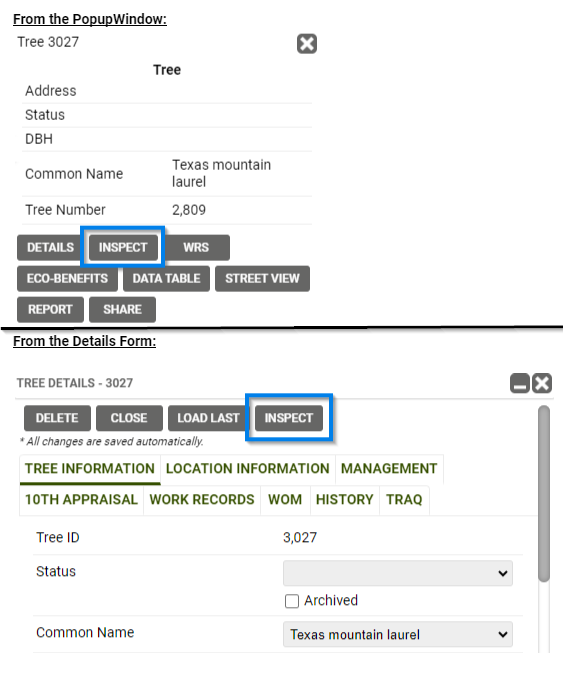
- Select an Asset from the map.
- Open the Inspection form by either of the following methods:
- Use the shortcut ‘Inspect’ button in the popup window
- Open the Details form and click the ‘Inspect’ button at the top of the form.
- The Inspection form opens and you can start adding data.
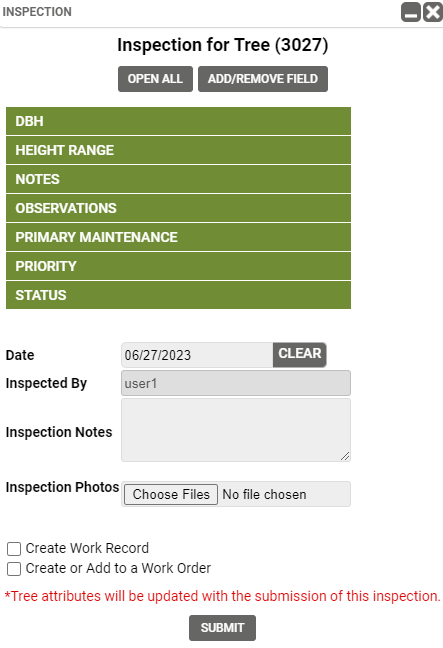
Inspection Tool Properties:
- Open all fields options with one click!
- Add or Remove field options with the Inspections Manager Tool
- Choose to Inspect on individual fields from your customizable list
- Store information separately from your assets’ details form such as Notes and Photos. Note: that the ‘Choose File’ button will allow you to take 1 photo directly with the camera on the device, or to navigate to the image(s) you wish to select. You can add up to 5 images if you browse to them.
- Add Work Records during an Inspection
- Submit your Inspection
Note: If this is an asset’s first inspection, it will automatically generate an initial inspection based on the Details values

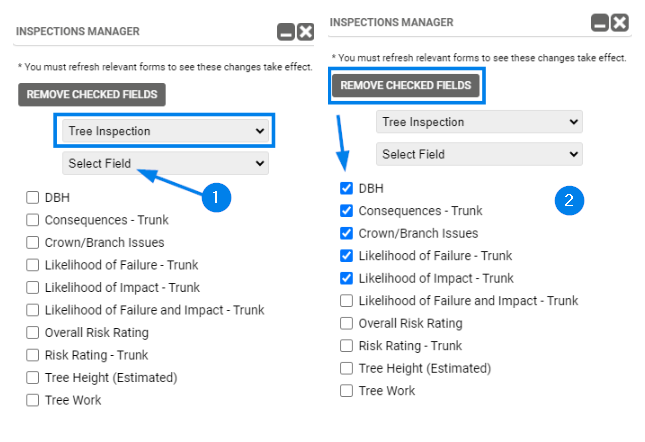
Adding or Removing Fields:
- To add New Fields to the Inspection List: Click the Select Field drop down, then select the fields you are wanting to upload.
- To Remove Fields from the list: Check the checkboxes for the fields you are wanting to remove. Then click the ‘Remove Checked Fields’ button.
Viewing Past Inspections:
Browse to the History tab within the Details form and select the Inspection tab, if necessary. The Inspection table within this tab updates to show all Inspections that have been performed over time.
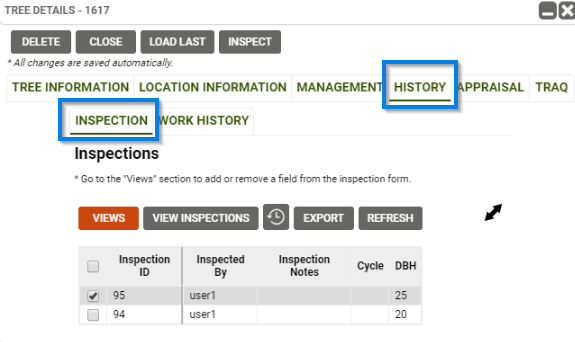
From within this table, you can view the detailed Inspection forms from past Inspections or export Inspections.
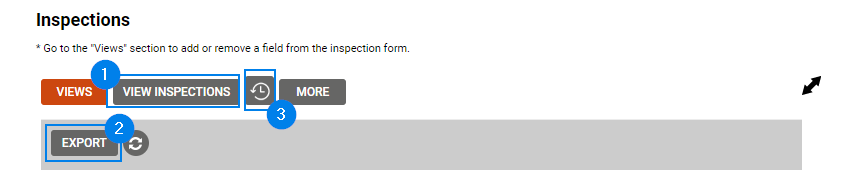
- To view the Detailed Inspection form, check the box of the Inspection row you are interested in. Click the ‘View Inspections’ button.
Note: Checking the boxes for multiple Inspections will allow you to quickly tab through several Inspections of a single asset. To navigate between multiple Inspections, use the black arrows at the top of the Inspection window that opens after clicking the ‘View Inspections’ button. - To export, follow the same process as above, but click on the ‘More’ button, then the ‘Export’ button to download a CSV or shapefile of the data.
- Click the Clock icon to see the state of the Asset Details form before a set of Inspections.
Known Limitations:
- The order of the fields on the Inspect form:
- Fields may be displayed in alphabetical order.
- Fields may otherwise by displayed in the order they appear on each tab.
- If you are interested in having a custom field order, please contact support, who can help configure and update.
- It is not possible to mass update or mass create inspection records.