The Work Orders layer within the Work Order Management Module in TreePlotter INVENTORY™ is a way to store, categorize, and report on work tasks happening at an organization. You can add Work Orders to organize the work needed for specific crews, during different times of year, or work needing to be sent to a contractor. Work Orders can be created a few different ways, and there are lots of ways to share Work Orders to your peers, and other crews.
Topics Covered in this Tutorial:
- Using Work Orders for Organization
- Adding Work Orders to the Map
- Adding Work Records to a Work Order
- Printing or Emailing your Work Order
- Associate Costs to a Work Order
- Close Out Options
- Work Order Reporting Options
Using Work Orders for Organization of Work
In TreePlotter, Work Orders provide the opportunity to organize large amounts of work tasks. Within a Work Order, you can link appropriate Work Records (or work tasks), and link them to existing Service Requests.
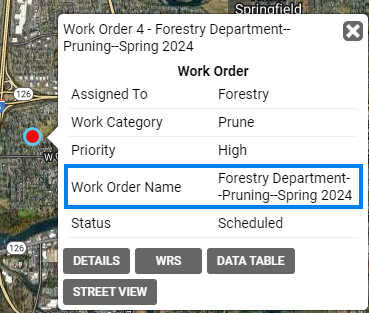
Some methods of organization is to populate the name of the Work Order with appropriate naming to outline the tasks needing to be done. Examples include: Tree Planting Spring 2024, Tree Pruning 2024, Tree Pruning-Sunset Park-2024.
The fields available in Work Orders like the Assigned To, Work Category, or the date they were created can help to provide further ways to filter on Work Orders for later use in reporting, or cost analysis. Examples include all work tasks Assigned To the Operations Crew, or Planting Crew, or All Removals.
Filling in the fields available when adding a Work Order will give the option to filter on that data, and simply find it later on.
Adding Work Orders to the Map
There are a few different ways to add Work Orders in TreePlotter. The methods to add a Work Order are:
Click on the underline text for the detailed How To article. For the complete list of methods, click here.
- Adding a Work Order directly to the map using the Add Button
- Simply click on the Work Order Layer in the Legend to view the Work Orders on the map
- Click the Add button in the top right corner to Add a Work Order
- Chose the Location of the Work Order according to a spot on the map, or through an address
- NOTE: If choosing to add By Address, it is required to enter the address number, street, city and or state/council in order for the point to be added to the correct location.

- Adding a Work Order via a Tree or Asset Inspection
- Click on a tree, and click Inspect in the pop up to start your inspection.
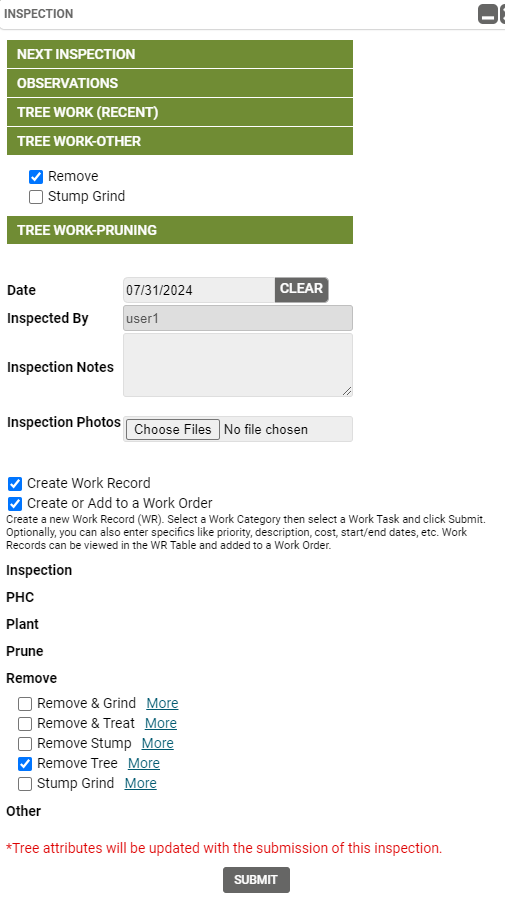
- Fill out the inspection form.
- At the bottom before submitting, indicate whether you want to add a Work Record(s) to the tree.
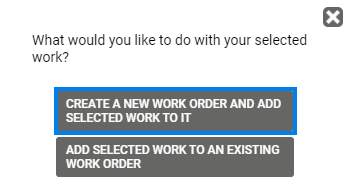
- Next, check the box if wanting to add the Work Record to a new Work Order.
- Follow the prompts to place the new Work Order on the map.
- The Work Record created during the Inspection will be found within the newly created Work Order.
- On the next inspection, the next Work Record can be added to the Work Order that was just created by finding the name of the Work Order in the prompt.
- Adding a Work Order through a Service Request
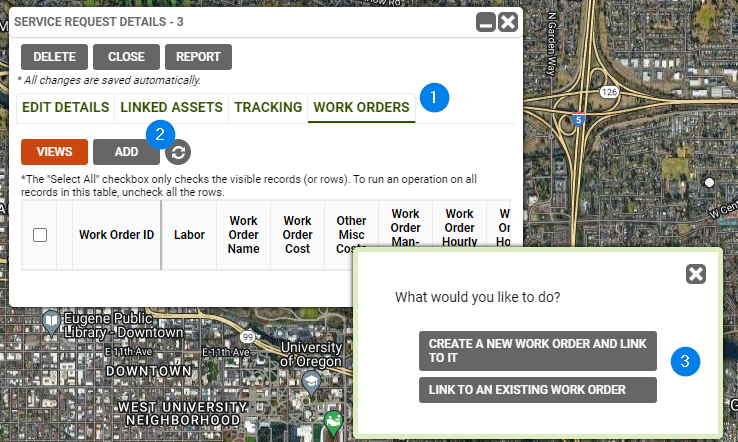
- From the Service Request Details form, click on the Work Orders tab.
- Click the Add button
- Chose whether you would like to Create a new Work Order or Add the Service Request to an Existing Work Order.
- If adding a new Work Order, chose the spot on the map where you would like to Add the Work Order.
- If chosing an existing Work Order, select the existing Work Order in the list that appears on your screen.
Adding Work Records to a Work Order
There are two ways to add Work Records to an existing Work Order in TreePlotter.
Click on the underline text for the detailed How To article
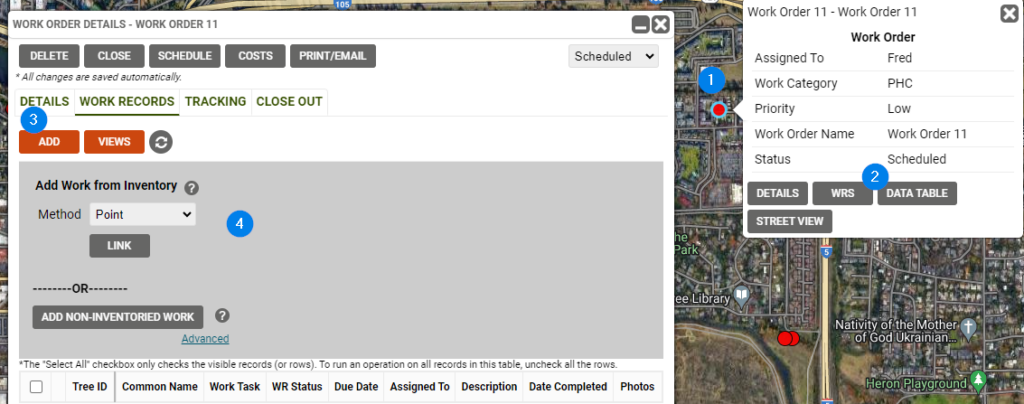
- Adding Work Records using the Work Order details form
- Click on a Work Order.
- Click on ‘WRS’.
- Click on Add and select a method to link Work Records to that Work Order
- When finished, click Link.
- Next update your newly added Work Records using the ‘Update’ button.
- Adding Work Records to a Work Order using the Tree or Asset Inspection
- Click on the Tree you are Inspecting on the map
- Click ‘Inspect’
- Implement your Inspection on the Tree
- When completed, at the bottom of the form, check the box to ‘Add Work Record’, and ‘Create or Add to a Work Order’
- Next, select the type of work you would like to add by clicking on the bold font. Then, check the box next to the task. This will create the Work Record.
- Click Submit.
- You will be prompted to choose if you would like to add to an existing Work Order, or new Work Order. Continue with the prompts, and the Work Order details will open up for you to view the Work you created.

Printing or Emailing Your Work Order
In the Work Orders details, there is the option to print the existing Work Order, or send to a colleague or crew member over email.
Users can send preview’s of the work by configuring what the email or print out will look like. Options include maps, labels, lists of recipients, and options of what data to include.
For the full information on Printing or Emailing your Work Order, click here.
Associating Costs to Your Work Order
The Cost Module in Work Orders go beyond what is available for costs on the individual Work Record. Using Work Order costs, you can report on costs of Labor, Hours, Hourly Rates, the price of Equipment and Materials, in addition to, costs that were already added on the Work Record level.
If you do not see Work Order Costs, but have a Work Order layer in your TreePlotter application, reach out to support@planitgeo.com to install it for you.
To learn more about how to implement Costs on your Work Orders, click here.
Work Order Reporting Options
There are many reporting options in TreePlotter INVENTORY to report on Work Orders. In the Hub, there are quick reporting options which allows users to apply a filter to the data based on time frame of work without needing to set a specific filter.
Cost of particular items like Labor Costs, Equipment Costs, and Hourly Costs will show in the Work Order Summary report.
The Work Order Summary Report also shows line items for each Work Task that was part of the Work Order.
To read more about Reporting options for Work Orders, click here.
Closing Out Work Orders
To remove completed Work Orders from the map and archiving the data, Closing Out the Work Order can be a great option.
The Close Out feature allows for you to archive the Work Order, update any existing Work Records or asset information, or even send an update to your supervisor.
For a detailed look into how to Close Out Work Orders, click here.
Known Limitations
- Work Orders are a point on the map. They can be associated with Work Records that are not at that location. Therefore, the location of the Work Order is a summary or centroid point for the work taking place.
- When sharing a Work Order, user permissions must allow the user getting shared the data to see the Work Order, associated Work Records, and the Trees belonging to the Work Order.
- When you filter on the Work Orders layer, the other layers in TreePlotter will automatically filter. This includes any asset layers like Trees, Work Records, and Service Requests.
