
This workflow will help to share TreePlotter™ data with your customers, clients, or other stakeholders. Follow the steps below, and allow access to other users to see specific information in your TreePlotter account. This workflow is recommended for private firms sharing their data with their customers.
Overview of the Steps Involved:
- Step 1: Create a log in for the new user.
- Step 2: Apply a mandatory filter for their user log in.
- Step 3: Check their user permissions to make sure those permissions align with your needs.
- Step 4: Create a map scenario of their data.
- Step 5: Share relevant information with the stakeholder.
Let’s Begin!
Click on the individual steps below to see more information.
Step 1: Create a log in for the new user.
Supporting Documentation:
Create a log in for the new user. This will give the new user access to TreePlotter to view their trees within their Client Site.
- Log into TreePlotter.
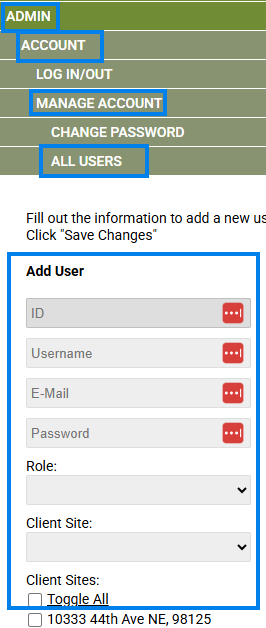
- Go to the Hub>Admin>Manage Account>All Users
- In the Add User section, Leave ID as it is
- If your username has automatically populated the Username field either delete it out or click the ‘CANCEL’ button
- Enter the Username
- Enter their email address
- Enter a password for them
- Select the appropriate Role from the Role drop down
- Select a primary Client Site to assign them to. *This might not appear if you do not have a Client Site layer turned on.
- Check the boxes to allow them access to more than one Client Site if applicable. *This might not appear if you do not have a Client Site layer turned on.
- Click the ‘SAVE’ button
- Store the password, username, and email on your end. We will use this later on in this workflow.
Step 2: Apply a mandatory filter for their user log in.
Supporting Documentation:
- Using the Advanced Filter (video at bottom of page)
Apply a mandatory filter for their user log in. This will ensure the user can only see the data you want them to see.
- If there is only one Client Site you would like the user to see, simply Load Trees for that Client Site, then skip to step 7 in this section.
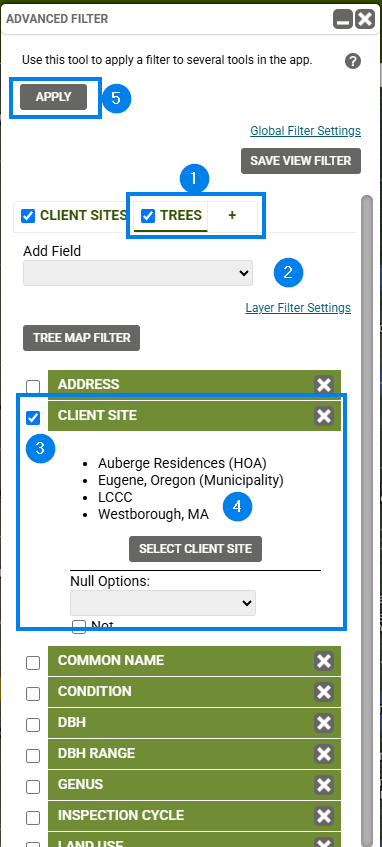
- If you are looking to have the user see multiple Client Sites, open the filter, and select the Trees layer and follow the rest of the steps below.
- Add the Client Site field into the filter, or another field that will indicate which trees you want the new user to be able to see.
- Select the Client Site field from the filter and select the Client Site you would like the stakeholder to see.
- When finished, the Client Site checkbox will be selected, and the Client Site name will appear under that field within the filter.
- Next, Click Apply to apply the filter.
- Check to make sure the filter is applied correctly to ensure that the correct data is showing on the map.
- Navigate to the user you just created in Step 1 above (Hub>Admin>Manage Account>All Users) You will find it in the rows within the user table at the bottom of the All Users section.
- Use the search if you have lots of users in your application. The search will make finding the user super easy!
- After finding the user in the table, scroll to the right of the table.
- Click on Apply Filter to apply a mandatory filter for that user.
Step 3: Check their user permissions to make sure those permissions align with your needs.
Supporting Documentation:
- Data Field Editor (video at bottom of page)
Check the new user permissions to make sure the user has appropriate permissions. This will ensure the user has appropriate access to TreePlotter that aligns with your needs, and the needs they have.
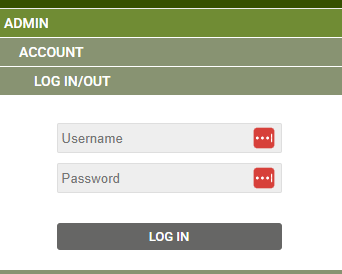
- Log out of TreePlotter.
- Log in as the new user you created in Step 1. You can use the Username and Password that you set up.
- Open the tree details form, and see if the amount of data fields they are able to see is appropriate.
- Go to the Hub and make sure their access to tools is appropriate.
- If you want to control permissions for the user role, you can go to the Hub>Data Tools>Data Field Editor>Trees, and open the permissions columns for certain fields you are wanting to show or hide for that user.
- If you find any other access related issues, reach out to support@planitgeo.com.
- Log out of the new user log in when finished.
- If everything looks great, proceed to the next step.
Step 4: Create a map scenario of their data.
Supporting Documentation:
- Using the Advanced Filter (video at bottom of page)
- How to Apply Labels on the Map
- How to Create a Map Scenario
Create a map scenario for the user to create a specific virtual map for them to use. This will provide them with a detailed map with labels, or colors on the map that pertain to their interests.
- Log back in as your admin user.
- Load the data that you would like to share with the user on the map.
- This can mean just loading the Client Site, or applying a filter for all of the Client Sites like you did in Step 2.
- Adjust TreePlotter to show the area you wish to share, zooming in as needed and change the base map if preferred
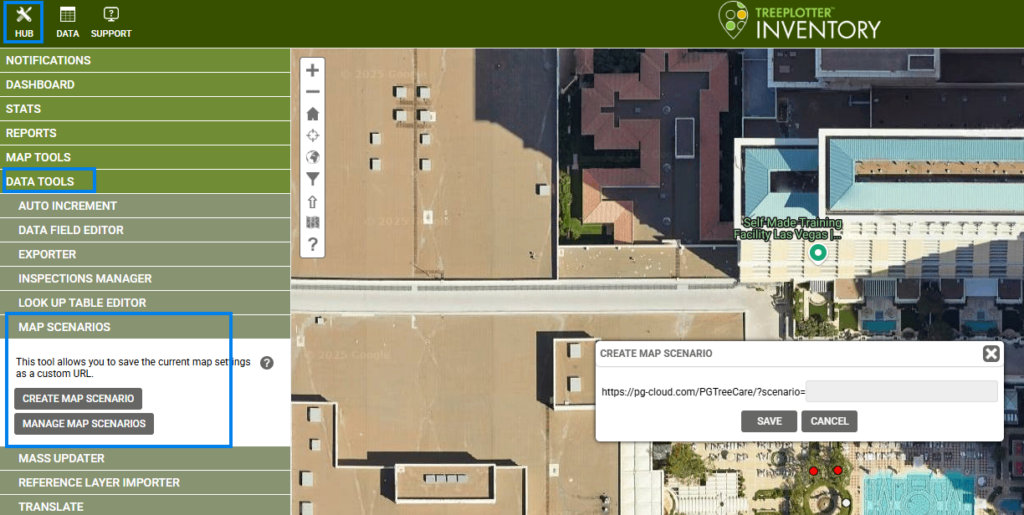
Set up TreePlotter to look how you want it to, apply a filter, labels, the Display By on the legend etc - Click on Hub > Data Tools> Map Scenarios > click ‘Create Map Scenario’
- Enter the name of your scenario and click ‘Save’
- Click the Copy Link button to get the new URL Run it to be sure if shows everything you intended
- Store this URL to share with the stakeholder in the next step.
Step 5: Share relevant information with the stakeholder.
Share relevant information with the new user, stakeholder, or partner.
- Share the Username, Password, Email and TreePlotter Map Scenario with the new user over email, chat, phone or through another means.
- Feel free to link any information from our Support Site that will help them!
Helpful links for the new User: