
Here are the steps to create a Map Scenario TreePlotter™. Map Scenarios allow you to share a map with colleagues, zoomed into the area you want, with any filters already applied, with any labels you need, and colour coded as you choose.
Prerequisites:
Steps:
- Adjust TreePlotter to show the area you wish to share, zooming in as needed and change the base map if preferred
- Set up TreePlotter to look how you want it to, apply a filter, labels, the Display By on the legend etc
- Click on Hub > Data Tools> Map Scenarios > click ‘Create Map Scenario’
- Enter the name of your scenario and click ‘Save’
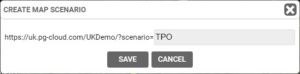
- Click the Copy Link button to get the new URL Run it to be sure if shows everything you intended
- Share as required
Known limitations:
- You need to be logged in as a user with the Admin role in order for the menu options to appear
- Ensure all of the menu items in the Hub are closed, unless you want them to be displayed as part of your map scenario
- If you have filtered for a particular subset of records, the recipient of the map scenario will still be able to turn off the filter to see the rest of the records. If you wish to limit their access, their User account will need to be restricted