
Use the Exporter tool to save an copy of your TreePlotter™ data to an external location. Data can be exported as a CSV, Shapefile or DXF. Exporting data allows you to carry out further analysis on it or bring it into another application. Use this tool to export photos, attachments and Eco Benefit data too.
Topics covered in this tutorial:
- Navigating to the Exporter Tool
- Export Types
- Layers
- Example export
- Control which data records are exported
- Control which data fields are exported
- Use as a backup/snapshot
- Exporting photos or attachments
- Exporting Eco Benefit data
- Troubleshooting
- Video Tutorial
Navigating to the Exporter tool:
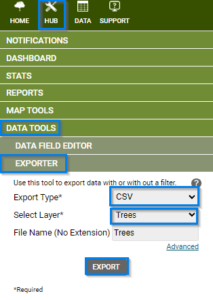
- Go to HUB > Data Tools > Exporter.
Export Types:
Data can be exported as different file types so that you have the data in the format that you need. The most frequently used options are CSV and Shapefile.
- CSV
- An export type of CSV will save the data as a comma separated file, that can be opened as a spreadsheet or text file
- Shapefile
- An export type of Shapefile will save the data as a collection of files, that can be opened with any geographic information system (GIS) software
- Shapefiles exported from TreePlotter are projected in Web Mercator (Auxiliary Sp) (EPSG:3857)
- This option is recommended for line or polygon layers
- DXF
- A third option, available upon request if not already activated, is DXF. This will save the data in a format that can be opened in AutoCAD.
Layers:
TreePlotter is made up of layers; a layer containing tree information, a layer containing work orders etc. This dropdown box will list all of the available layers that you can extract. You can only export one layer at a time.
File Name is optional and allows you to name the file created, perhaps with the name of the layer, especially if you’ll be exporting additional layers. There’s no need to include the file extension at the end.
Example export:
- Check whether there are any filters applied as all filters set at the time of the export will be applied to the export data
- Choose the file type required, ie CSV or Shapefile, from the Export Type dropdown
- Choose the layer you want to export from the Select Layer dropdown
- Optional: Enter a File Name. If File Name is left blank, the system will use a default name.
- Click the ‘EXPORT’ button
- The file(s) will be exported to your downloads folder.

Control which data records are exported:
The Exporter tool is connected to the filter, which means if you have a filter on and then run the Exporter, it will only export the records included in the filter.
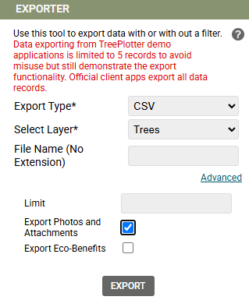
Under the Advanced hyperlink is the Limit box. If you just want a sample of data, then you can enter a number of 5 or 100, say, to get a smaller subset of data instead of the entire data set.
Control which data fields are exported:
The Exporter tool will export everything, in alphabetical order. If you which to have less fields and in a particular order, there is an Export option in the Data Table that allows exactly this in conjunction with the Views tool (see Tutorial: Data Table for more information).
Use as a backup/snapshot:
All data fields for the layer will be included in the export. This makes it an excellent method to take a quick backup of the data, perhaps before running a mass update. It could also act as a snapshot in time of your trees in TreePlotter, perhaps taken annually so you can make comparisons over time.
In the event that a restore is needed after running an update, please contact the Support team. Please note a restore may incur a charge.
Exporting Photos and Attachments:
Under the Advanced hyperlink is a check box that allows you to export photos and attachments.
- The Export Type can be CSV or Shapefile – it will create an export of the records so you know which records the photos are linked to
- Select the layer that contains the photos
- Click Advanced and check the ‘Export Photos and Attachments’ box
- Click the ‘EXPORT’ button. You will receive the following message:
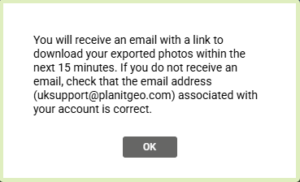
- The records will be exported to your downloads folder and the photos will be emailed to you. The message includes the email address associated with your account.
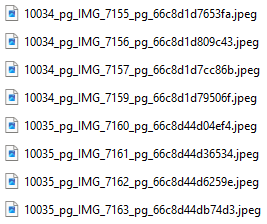
- The photos should be prefixed with the Primary ID of the asset, please contact Support if that isn’t the case for you
Exporting Eco Benefit data:
If you have the Eco Benefits i-Tree add-on module, then this will be available to you.
- Choose the Export Type (can be CSV or Shapefile)
- Select the Trees layer (Eco Benefit data is only available on trees)
- Click Advanced and check the ‘Export Eco-Benefits’ box
- Click the ‘EXPORT’ button
- Open the file downloaded. The Eco Benefit values will be against each tree after all of the other attributes.

Troubleshooting:
- If nothing happens when you click the ‘EXPORT’ button, check to see if your browser has a popup blocker active. If it does and the blocker is active, turn the popup blocker off.
- If you get the message ‘Please select a layer’, please specify the layer you wish to export with the ‘Select Layer’ dropdown box

- If your TreePlotter application does not have an option for drawing exchange format (DXF) Export Type please contact TreePlotter support HERE so they can add the DXF format
- If your photos aren’t prefixed with the Primary ID (which allows you to identify which photo belongs to which tree!) please contact the Support team.
Known Limitations:
- All columns will be exported. If you want to export a limited number of columns you can do this using the Exporter tool from the Data Table
- Ensure you haven’t ticked the Export Eco-Benefits box for layers that aren’t Trees, otherwise the export file will be blank.
Next Steps:
- Tutorial: Advanced Filter
- Tutorial: Data Table
- How To: Export Data to CSV or Shapefile
- How To: Export Eco Benefits data
- How To: Export Photos
- How To: Import Photos into Google Sheets