
If you have closed out a Work Order and you didn’t mean to, this document is for you! We’ll go through how to unarchive the work records as they will have automatically been archived from TreePlotter™. You can still follow these instructions, even if you don’t have work orders.
Prerequisites:
Overview:
The process is to unarchive the Work Order and then unarchive the Work Records. If you don’t have a Work Order, skip ahead to the unarchiving Work Records section.
Unarchive the Work Order:
- Set the layer in the Legend to ‘Work Orders’
- Click on the Advanced Filter icon on the Navigation toolbar
- Filter for Work Orders where Archived is ticked
- Find the WO on the map or zoom to it via Data table > Work Orders
- Click Details and make a note of the Work Order ID
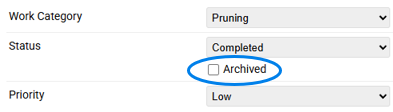
- Untick the Archived box
Note: At this stage, the Work Records won’t have come back yet!
Unarchive the Work Records:
- Go back to the Advanced Filter and click the ‘Clear All Filters’ button
- Add Work Records to the filter (the plus sign)
- Filter where Archived is ticked
- and WO ID is the Work Order ID noted earlier (just filter for archived if no WO)
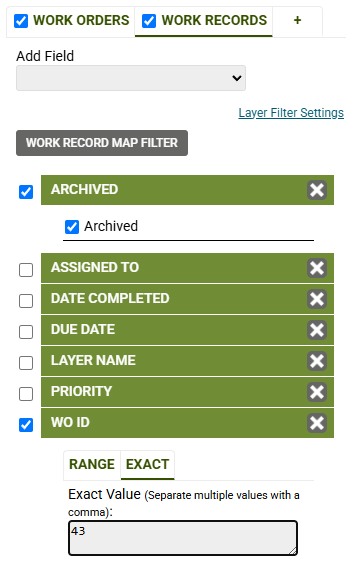
- Click ‘Apply’
- Go to the Data table > Work Records > Work History tab and ensure it’s showing exactly the records you’re expecting
- Are there more or less records than you thought?
- Do you need to apply an additional filter of Date Completed = the date you archived them by mistake?
- Perhaps you already have the WR ID numbers and can filter on those specifically?
- Go to Hub > Data Tools > Mass Updater > Select the Layer of Work Records
- Check the number it says you have selected ties up with what you are expecting!
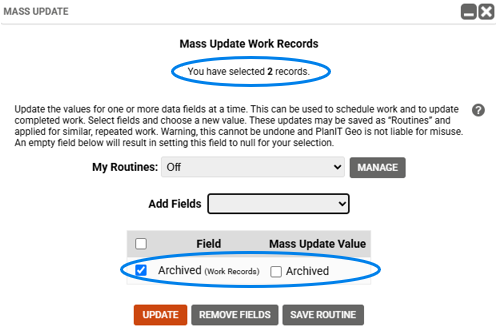
- Click on Add Fields and choose Archived from the list
- The Field ‘Archived’ should be ticked (because that’s the field we want to update)
- The Mass Update Value of ‘Archived’ should be unticked (because we want to untick it for all of the selected work records)
- Click ‘Update’ and confirm you’re sure (assuming you are sure and the number is correct!)
- On the Advanced Filter, click ‘Clear All Filters’
There should now be a live work order with live work records.
Additional steps, if needed:
- You may need to change the Work Order ‘Status’ field so that it’s no longer marked as Completed
- You may need to use the ‘Update’ button on the Work Records tab (of the Work Order) to change the Work Record ‘WR Status’ field and blank out the ‘Date Completed’
Known Limitations:
- Generally, the Mass Update tool is only available for Admin level users.
- The Work Order Management module is an add-on for TreePlotter