
If you have data with tree coordinates in eastings and northings (most likely our UK customers), they will need to be given a coordinate system before uploading them. This tutorial will show you one way to do this, using QGIS (free GIS software).
File Prep
- You should have a CSV with the assets in, along with a column for Eastings and a column for Northings
- Ensure the data is ready to upload in all aspects except the coordinates
- Take this opportunity to remove any spaces in the headings

Import into QGIS
- Open QGIS (install it if necessary, note that PlanIT Geo accepts no liability for 3rd party software)
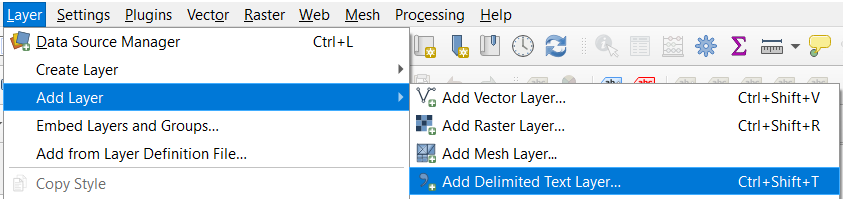
- Layer > Add Layer > Add Delimited Text Layer
- Click on the ellipsis after File Name and browse to your file
- It should auto populate most of the information for you, but check the following:
- File Format – CSV
- Geometry Definition – X Field has the heading of your Easting column and Y Field the Northing
- Geometry CRS should match the geometry of the data, probably EPSG:27700 British National Grid at this stage
- Click Add
- If prompted to choose a transformation method, select the most accurate one (smallest number of metres)
- Display a map in the background such as OpenStreetMap (under XYZ Tiles) to double check the location of the points is where you’re expecting them
Export the data
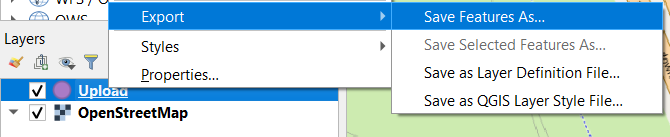
- Right click on the layer that contains your points > Export > Save Features As
- Save the Format as an ESRI Shapefile
- Give it a file name and save it
- Change the CRS to EPSG: 3857/WGS 84

Upload into TreePlotter
- Zip up the shapefile files into one zip file
- Continue with the Uploader process to upload your shapefile!