Topics covered in this tutorial:
- File Types
File Type
Data can be uploaded using either a Shapefile or a CSV file.
Shapefile – A Shapefile is composed of several component files, all of which must be compressed into a .zip file prior to upload. These files include: shp, dbf, prj, shx. A shapefile will be required for any polygon data.
CSV – A CSV file with latitude and longitude data and a known coordinate system, also known as a Comma Separated Variable file, can also be used in the Uploader.
Tips:
CSV and Shapefile
- Work through your file column by column to check that each corresponding field exists and is the same data type in TreePlotter.
- For number fields, make sure the number columns in your source data only contain numbers.
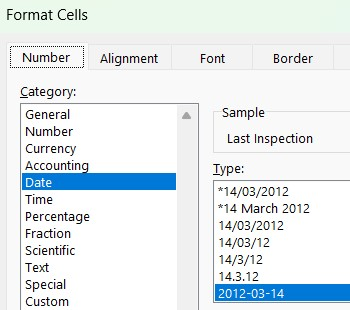
- For date fields, make sure the Dates are in US Date format (Month/Day/Year) if you are located in the US or Canada. If outside the US or Canada, you can enter your dates in YYYYMMDD or YYYY-MM-DD format (use the Format Cells option in Excel).
- Make sure the options for each dropdown list or radio button column have a matching field in TreePlotter, adding any missing fields.
- For numbers, dates, and text fields in TreePlotter, there is no need to make sure the options are within your TreePlotter fields. In the Uploader, you will be able to copy over those numbers, text or dates into those corresponding fields.
- If options in the dropdown list or radio buttons are written exactly as they are in TP, that will save you time manual mapping later on.
- All data rows must be consecutive, no blank rows between the rows with data.
- For any null values, make sure the cell is blank. Do not include values of NULL where the data is not filled out. Instead, just make all NULL cells empty.
- Species is one of the most important fields to get right, and it is easier if there is an exact match for each species.
- You can download a copy of your species list by going to Hub > Data Tools > Lookup Table Editor and clicking on the download button to the right of Species (click here for a quick video).
- Add any missing species using the Lookup Table Editor.
- If you’re having trouble uploading the spreadsheet, you may find copying and pasting the entire contents into a new spreadsheet (paste it ‘as values’ so it doesn’t copy over any of the formatting). Then save it in CSV UTF-8 format.
- If you only have Eastings and Northings, use QGIS, or other GIS software, to convert the CSV into a shapefile. (See additional notes on this process here.)
- Headers should be 10 characters or less and contain no spaces or special characters. The only special character allowed is an underscore _. They should not contain only a number. It is best to use only lowercase letters and numbers.
- Checkbox and Multi-Select fields require different handling than other types of fields. See our support site article regarding these fields. Checkboxes and Multi-Select
Shapefile
- Make sure your shapefiles are projected to EPSG:3857 – WGS 84 / Pseudo-Mercator.
- The data should be Point, Polygon or Line. Multi Point data is not accepted in the Uploader.
- Esri Feature Classes, Geodatabases or Geopackages will not work within the Uploader tool.
If for some reason there is an issue with your upload, contact support@planitgeo.com and send over a copy of the data that was used, when the upload was attempted, and a description of the issue encountered. We have the ability to isolate your upload on the back end, and make changes in many cases.
Examples
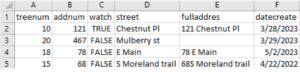
Below is an example of how your Comma Separated Variable file should not look.
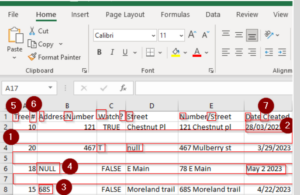
This file has blank lines between data lines (1), invalid dates in date field (2), an invalid number in a number field (3), Null in any column or row (4), in the header there are Caps (5), special characters other than Underscore _ (6), headers longer than 10 characters. Invalid True/False value. These are all things to avoid.
This is an example of what your CSV file should look like.