
The Map Scenarios tool allows you to save a customized variation of TreePlotter™. The Map Scenario will show the map you selected, any filters you had in place, reference layers, and more. This saves you time from recreating the same map over and over again. The scenario can be shared with colleagues or even used as your regular shortcut to TreePlotter. Read on to learn how other TreePlotter customers have used Map Scenarios and to learn how to create a Map Scenario for your unique needs!
Topics covered in this tutorial:
- Uses for Map Scenarios
- Creating Map Scenarios
- Examples
- Revisit or Delete Map Scenarios
- Video Tutorial
Uses for Map Scenarios:
- Shared with a colleague: e.g. a Map Scenario depicting trees that need to be pruned in the next quarter
- Saved as a shortcut: e.g. perhaps you work in a different area to the one that appears by default, so setting your shortcut to a Map Scenario will always start you in the right place saving you time.
- Viewed like an interactive report: e.g. you can filter accordingly but then have the relevant chart display as well
Examples:
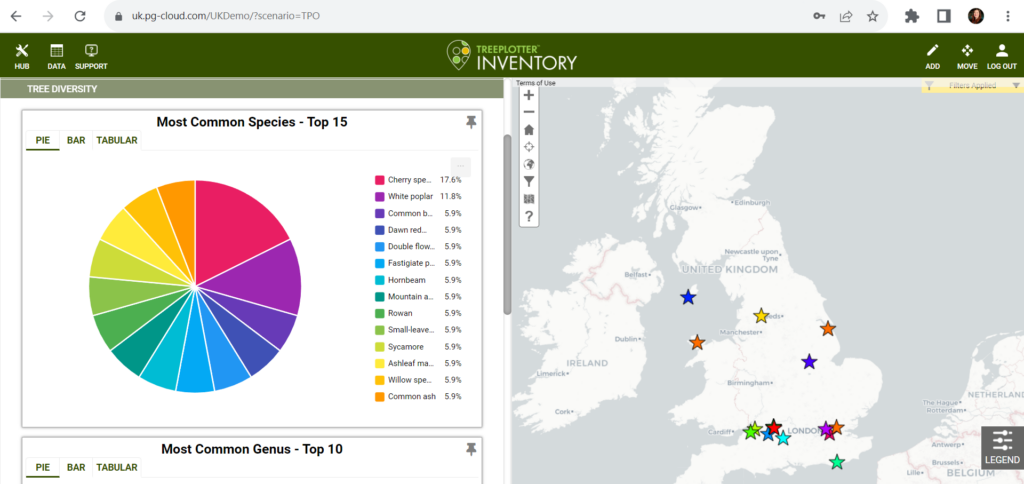
In this example, a filter has been applied to show trees with a Tree Protection Order (TPO), the base map has been changed, and the HUB > STATS > CHARTS AND GRAPHS > TREE DIVERSITY section has been opened so that the chart showing the species breakdown appears. This particular app has TPO trees shown as stars.
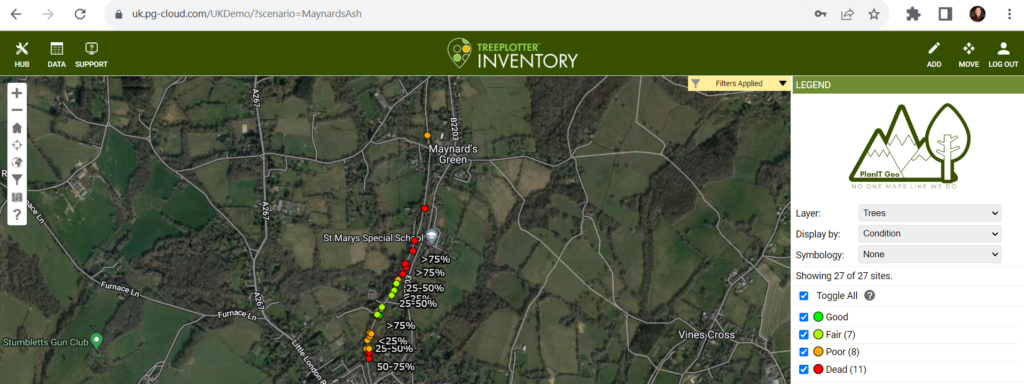
In this example, a Filter has been applied to show ash trees. The Filter is also by map to show a subset of the full map extent. The Display By dropdown inn the LEGEND has been changed to Condition, and Labels have been applied to show the dieback percentage.
Creating Map Scenarios:
- Zoom to your desired location, changing the base map if needed.
- Set any filters using the Advanced Filters tool
- Check that the appropriate Layer dropdown is selected within the LEGEND for your custom Map Scenario
- Check that the appropriate Display By dropdown is is selected within the LEGEND for your custom Map Scenario
- Turn on any additional imagery needed for your Map Scenario using the MAP TOOLS menu under HUB (e.g. labels, layer colors, etc.)
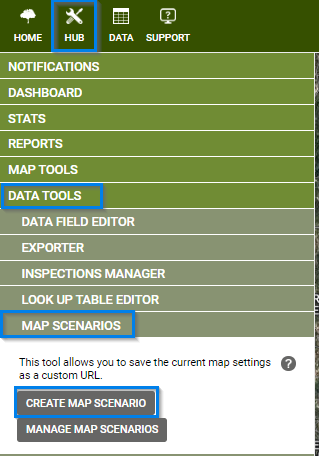
- Click on Hub > Data Tools > Map Scenarios > click the ‘CREATE MAP SCENARIO’ button
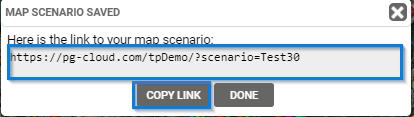
- You will be prompted to enter a custom URL parameter and click the ‘SAVE’ button.
- Names that provide details about the map scenario are recommended (e.g. Ash Trees in Poor Condition)
- Spaces between words within the name will be shown as dashes in the URL (e.g. Ash Trees in Poor Condition will become Ash-Trees-in-Poor-Condition)
- If the URL already exists (i.e. you’ve created two Map Scenarios with the same name), a number will be appended to the newest URL to differentiate it from the original URL.
- If the name field is left blank, the app will supply you with a custom number ID as the default option.
- Your map will now be saved. Copy your new URL by clicking on the ‘COPY LINK’ button.
This tool saves the following parameters:
- Map Settings: zoom, base map, map center
- Advanced Filter Settings: filters applied using fields, filters applied using the ‘MAP FILTER’ button
- Organizational Filters: for Sites with Organizations or Client Sites
- Filter Legend: current layer, display by field, custom imagery
- Map Extras: labels, layer settings
- HUB and Data Table: if these are open when the map scenario is created, then they will be displayed
- Be sure to close all menus in the Hub except for Map Scenario to ensure the HUB isn’t displayed
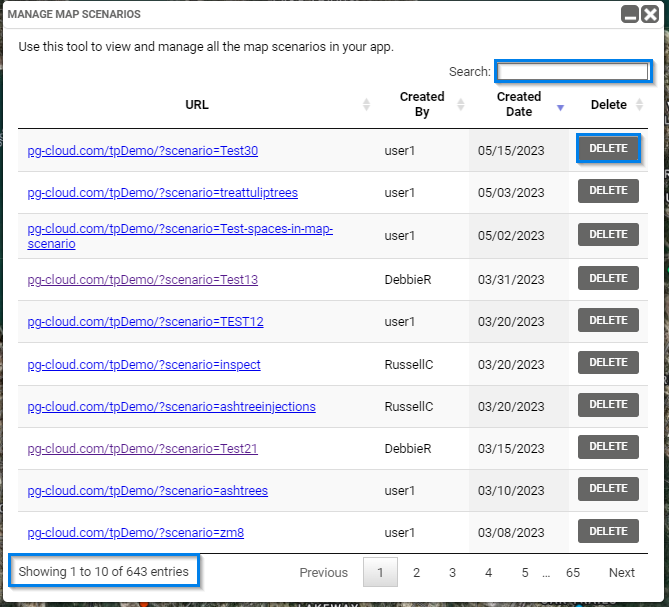
Revisit or delete Map Scenarios:
To revisit or delete any of your scenarios,
- Click on Hub > Data Tools > Map Scenarios
- Click the ‘MANAGE MAP SCENARIOS’ button
- A popup window will display the current Map Scenarios.
- At the bottom of the screen you can see how many total Map Scenarios there are.
- Use the Search box to find a specific Map Scenario.
- Any Map Scenarios that are no longer needed can be Deleted by clicking the ‘DELETE’ button next to the Map Scenario to discard.
Known Limitations:
- If your TreePlotter application is private, the User will have to have an account to log into the application. They will have the access rights of their own account.
- If your TreePlotter application is public, the User will have the access rights of the Public Role when not logged in.
- If you have filtered for a particular subset of records, the recipient of the Map Scenario will still be able to turn off the Filter to see the rest of the records. If you wish to limit their access, their User account will need to be restricted with a mandatory filter.
Next Steps:
- How To: Limit a User to a subset of data
- Views Filter
- How To: Create a Map Scenario
- Map Tools: Labels