
The Data Field Editor tool is available to admin users for those with a Complete TreePlotter INVENTORY™ application. With Data Field Editor you can add and edit the fields for any existing layer in your application. Use caution when utilizing this tool as changes are applied throughout the application, including past data, and cannot always be undone.
Topics covered in this tutorial:
- To access the Data Field Editor
- How to Add a field
- How to Edit a field
- How to Remove a field
- How to Edit Dropdown List/Checkbox Options
- How to Edit Field Permissions by Role
- How to make a field appear in the Popup
- Managing Tabs
- Data Field Editor Video Tutorial
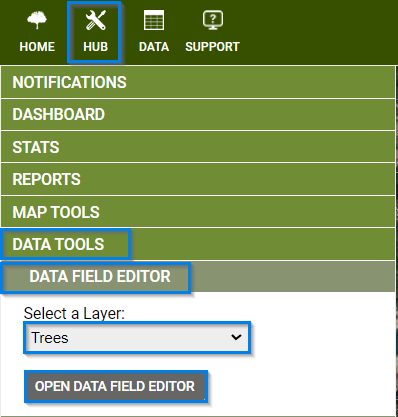
To access the Data Field Editor:
To access the Data Field Editor navigate to Hub > Data Tools > Data Field Editor.
- In the Select a Layer dropdown menu, choose a Layer (e.g. Trees).
- Click the ‘OPEN DATA FIELD EDITOR’ button.
How to Add a Field:
To add a field, click the ‘Open the Data Field Editor ‘OPEN THE DATA FIELD EDITOR’ button and choose the Layer you want to add the Field to.
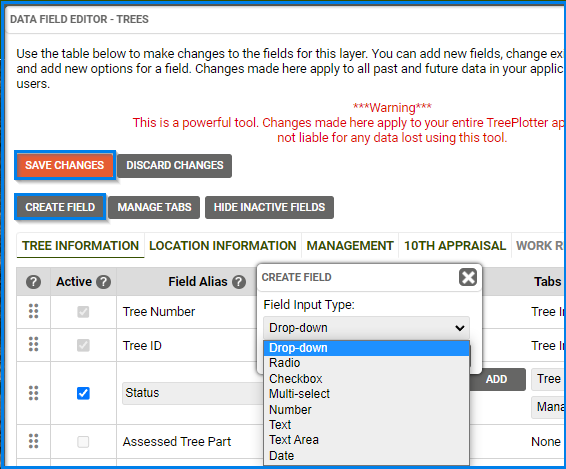
- Click the ‘CREATE FIELD’ button
- Select the field type from the Field Input Type dropdown.
- A new field will be added to the bottom of the list called New Data Field.
- To change the name of the new data field, click on New Data Field to replace this name with a name of your choice.
- Click the ‘Save Changes’ button to save any changes made in the Data Field Editor.
How to Edit a Field:
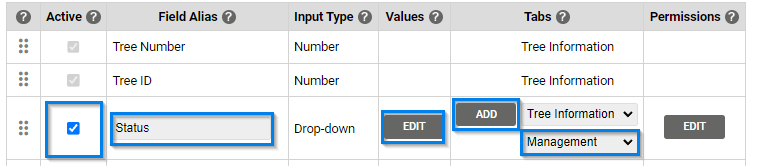
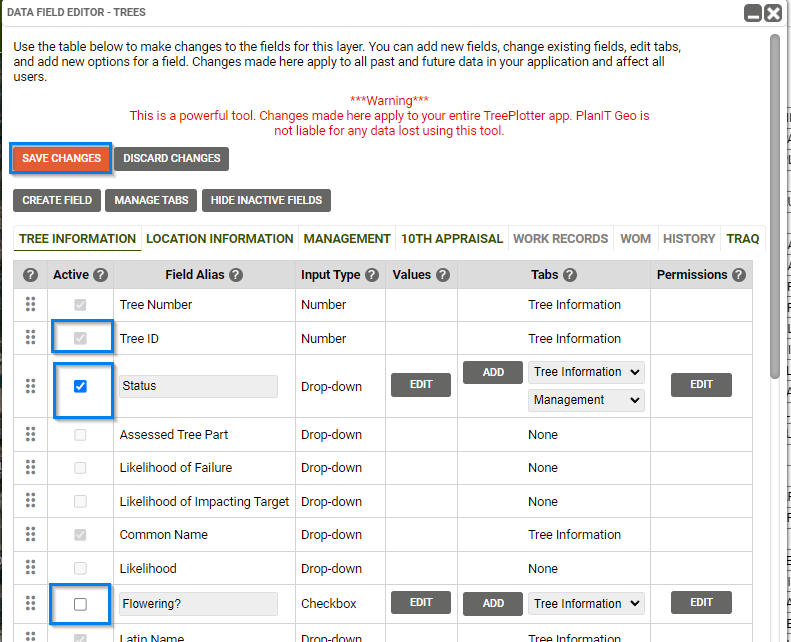
- The Active checkbox will turn a field off or on. Checked is on.
- To change the name of a filed that isn’t static (i.e. any field that isn’t greyed out), click in the Field Alias to change the name of the field.
- To add selections to an acceptable Input Type, click the ‘EDIT’ button in the Values field. For additional help, see How to Edit Dropdown List/Checkbox Options.
- Select the Tabs the Field will be under by selecting a tab from the Tabs dropdown menu. Click the ‘ADD’ button to add the Field to multiple Tabs.
- Click the ‘Save Changes’ button to save any changes made in the Data Field Editor.

Use the Dot icon to drag a Field up or down in the list to rearrange the display order of the Fields within Details. There are some settings that can override this order, so if it does not change the order in Details, please contact TreePlotter support here.

How to Remove a field:
The Fields that are not static (i.e. greyed out) can be removed from view by unchecking the toggle box in the Active column (e.g. Status and Flowering)
- Fields cannot be deleted in the Data Field Editor but they can be set to inactive so they will not be visible in Details, Advanced Filter, Data Table, Exports and Reports.
- Some fields cannot be edited at all from the Data Field Editor.
- If the Field is static (i.e. greyed out) it is not a Field that can be modified in the Data Field Editor (e.g. Tree Number, Tree ID, Common Name)
- Click the ‘Save Changes’ button to save any changes made in the Data Field Editor.
- If the field you want to remove is greyed out, please contact TreePlotter support here.
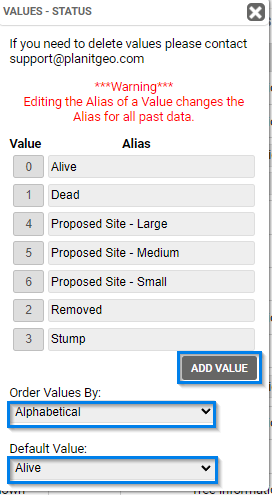
How to Edit Dropdown List/Checkbox Values:
- To edit a Value, select the ‘EDIT’ button in the Values field.
- An editor window will display the current Values (e.g. Alive, Dead, Proposed Site – Large, etc.) for the Field (e.g. Status).
- Add new Values by pressing the ‘ADD VALUE’ button.
- Keep in mind that once new Values are created, they cannot be removed from the front end. TreePlotter support has to remove them from the back end.
- The Value order can be changed with the Order Values By dropdown.
- A Default Value can be set using the Default Value dropdown.
- The default value will populate automatically in this field when a new item in that layer is added.
- If you change the Alias for a Value, all points that have that Value selected will now be set to the new name. For this reason it is not a good idea to try to change the order by changing the Alias’s that go with each Value.
- Click the ‘Save Changes’ button to save any changes made in the Data Field Editor.
How to Edit Field Permissions by Role:
Access the Field Permissions by clicking on the ‘EDIT’ button in the Field Permissions column.
- The All Roles section turns permissions off or on for all Users.
- The Individual Roles (e.g. Public, User, Admin, etc.) can turn permissions that are set to on for All Roles, off for individual roles. For example, if Overall Editable Field is unchecked in the All Roles section, turning it on for individual roles will not override the setting in All Roles. Deselecting a value that is turned on in the All Roles section will additionally turn it off for the Individual Role.
- Click the ‘Save Changes’ button to save any changes made in the Data Field Editor.
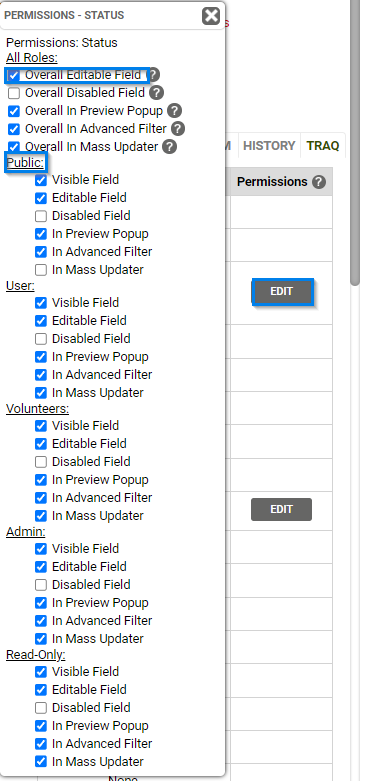
How to make a field appear in the Popup:
Access the Field Permissions by clicking on the ‘EDIT’ button in the Field Permissions column.
- In the All Roles section, check the Overall In Preview Popup box, which will make it appear in the popup when you click on an asset.
- Click the ‘Save Changes’ button to save any changes made in the Data Field Editor.
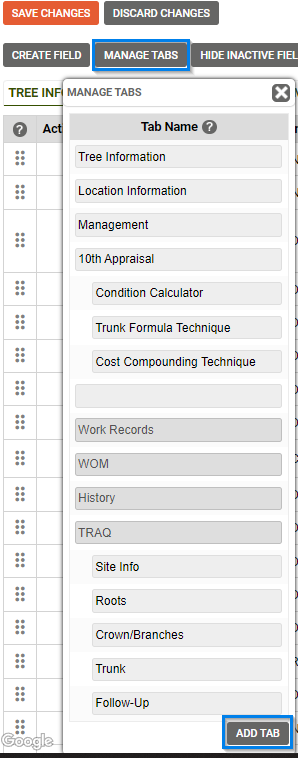
Managing Tabs:
New Tabs can be added from the ‘MANAGE TABS’ button.
- Click the ‘MANAGE TABS’ button to open the Tab Name menu.
- Click the ‘ADD TAB’ button to create a new tab to be added tot he Details form.
- Click Save Changes to save any changes made in the Data Field Editor.
- Note: you will need to save the changes and then reload the Data Field Editor tool before you can add any fields to the new tab.
Known Limitations:
Some fields in the Data Field Editor cannot be modified. If there is a field that is greyed out contact TreePlotter support here.
The Values for a dropdown, checkbox, or multi-select cannot be removed; these Values can only be added or edited by the User. However, TreePlotter support can removed them, if necessary. You must first remove that specific value from any inventory items that are using that value, then contact TreePlotter support here.
Next Steps:
- Tutorial: Lookup Table Editor (to change some lookup values that you can’t change here)