
To save time repeatedly recreating a filter in TreePlotter™, there is an option to save it to the Legend, so that it’s readily available.
Prerequisites:
Steps:
- Create the filter
- Click Apply
- Click the ‘Save View Filter’ button
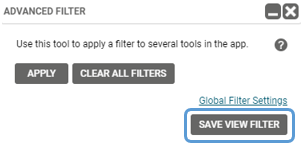
- If you are creating a new one, choose ‘Create New View’, give it a name and click Save. If you want to update an existing one, choose it from the list and confirm you want to overwrite it
- See that it appears in the Legend in the View Filter drop down
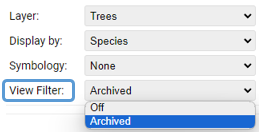
- To use it, simply select it from the list. To stop using it, simply choose ‘Off’ from the same list.
Known limitations:
- The saving of filters is per user, so you don’t have to worry about clogging up a colleagues list! If your colleague wants the same filter, they’ll need to create it themselves. You could share it with them as a Map Scenario if necessary
- If a Data View has been saved and it includes a filter on the number of assets shown, it will also appear in the View Filter drop down.