Want a video tutorial on how to add a tree? Click below:

Add a Tree
To add a tree to the map, you first must be logged in to  TreePlotter™ INVENTORY. Go to either the Log In Shortcut at the top right of the screen or go to Hub->Admin->Account -> Log In. Once logged in, two new buttons will appear next to the Log In Shortcut.
With Add Tool Activated:
Click the Add button to start an adding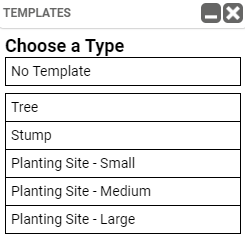 session. After clicking Add, a window will pop up with template information. These templates are designed to auto-populate information in the Tree Details form for convenience. For example, choosing “Stump” will auto populate the tree species information to “N/A”.
After choosing a template, crosshairs will appear with the note “Click the map to add a tree”. Find the location on the map where you wish to add a tree point and click on it. This will open the Tree Details form. When finished adding trees, click the add tree button again to end your adding session.
Note: On tablets and mobile devices, crosshairs will not show up after clicking the add button. Simply tap of the map with your finger or stylus to add your tree point.
Tree Details Form
Within the Tree Details form are all tree data fields for the trees inventory. Typically, fields are broken up into three or more tabs:
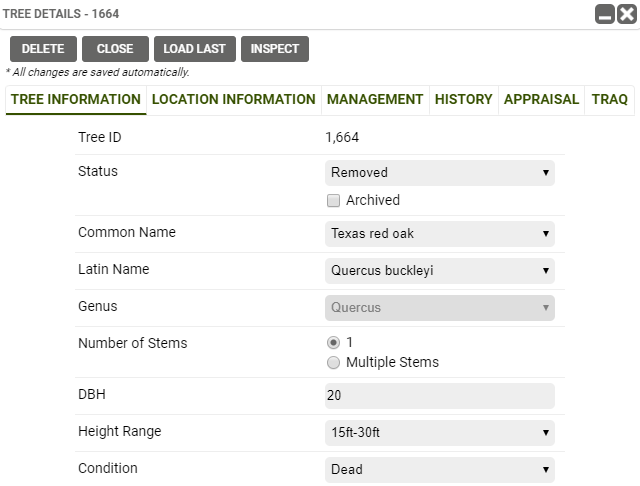
Tree Information – example fields include DBH, condition, crown width, and tree height.
Location Information – information like land use, address, city, and GPS coordinates.
Management – information like maintenance needs and clearance conflicts.
History – track the details of any work or inspections that were completed on a tree.
Appraisal – see the values of your assets using the Truck formula method calculator from the 9th edition Council of Tree and Landscape Appraisal guide.
Traq – an expanded tree risk assessment tool for INVENTORY software, and is based on the ISA Tree Risk Assessment Qualifications
Once you are satisfied with your entries, click Close (all changed are saved automatically). The tree is now part of your database. To add another tree, you need not click the Add button again; notice that a white hexagon is now present within the Add button. This means that you are still in an active adding session, and can add more trees by simply clicking the map.
If you find yourself in a situation where several trees with similar characteristics exist in a row, the Load Last button may be useful. Add a new point and click the Load Last button to populate all information (save for a predetermined list of fields like address and ID number) from the previous tree into your new tree. When used consistently, this tool can save hours of data collection time!
When you are done adding points to the map, click the Add button again to end the session.
Move a Tree
If at any time you want to change the physical location of a point, simply click the Move button located next to Add. Click and drag the point to the new desired destination.
With Move Tool Activated:
You will then be prompted to either update the address or keep it the same. If you choose to keep it the same, no address information will change. If you choose to update it, the geocoding service that PlanIT Geo uses will update the address based on the new location. This may or may not actually result in the address changing, depending on the geocoding service and spatial location of the point.


Note: To move a point on tablet or mobile devices, tap the move button, tap the tree point you would like to move, and tap the desired location on the map. You will still be prompted to change the address.
Add a Tree Using GPS
INVENTORY allows you to use the GPS location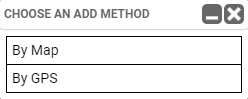 provided by your mobile device or a paired Bluetooth GPS receiver when adding trees. To use this functionality, use the methods described above with the following exception: after clicking the Add button, choose the appropriate template, and then select By GPS in the Choose an Add Method dialog box. Once you have given INVENTORY permission to access your device’s location, a point will automatically be placed on the map at your location, and you will be able to edit any details of the tree. You can also use the Move tool to fine tune the tree’s location, if necessary. For additional information and troubleshooting, please check our geolocation page.
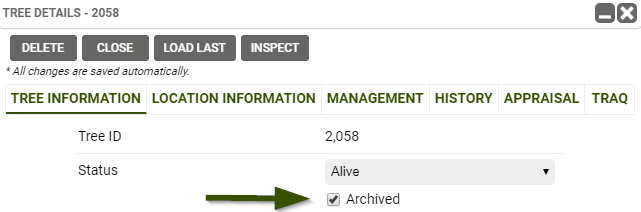
Archiving Trees
You can archive your trees to keep them from displaying on the map. For more information on archiving trees, visit our Archiving Records page.